概述 FutureTask意为将来的任务,它是juc包下Future接口的一个简单实现类,FutureTask的主要作用是用来包装Callable或Runnable对象,由于FutureTask本身也实现了Runnable接口,因此它相当于扮演了委托人的角色,将自己提交给线程执行,然后线程执行FutureTask的run方法,FutureTask内部再调用被包装的Callable或Runnable对象,并且提供了名为get的阻塞方法(基于CAS+LockSupport实现)以便当前执行线程能够拿到被包装的Callable或Runnable对象执行返回的结果。
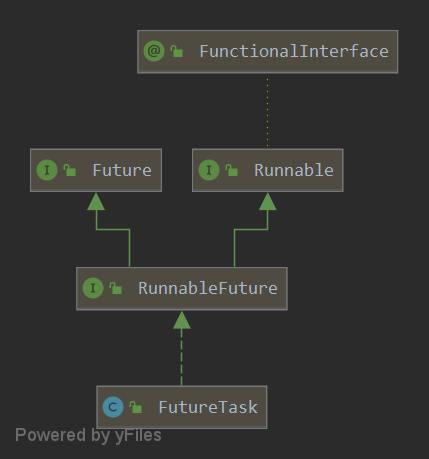
FutureTask 在分析FutureTask内部原理前我们先来看一下它的继承和实现的接口
从上图我们可以发现FutureTask实现了一个RunnableFuture接口,这个接口是干嘛的呢?我们点进去看一下这个接口的定义
RunnableFuture 1 2 3 4 5 6 7 package java.util.concurrent;public interface RunnableFuture <V> extends Runnable , Future<V> { void run () ; }
发现RunnableFuture继承了Runnable和Future接口,并且重写了Runnable的run方法,其实这个RunnableFuture笼统的讲是一个将来能够运行任务 ,但是由于java原生的Thread类只支持提交Runnable类型的执行任务,而Runnable本身是没有返回值的,提交给线程后就会立马被执行,你也不知道任务啥时候执行完毕,开发人员不能很好的控制提交的任务。因此RunnableFuture接口就出现了,它是用来替代Runnable接口的,同时继承Future接口的原因是因为Future内部提供了很多有用的方法以便我们能够灵活的控制提交给线程的任务,例如取消刚刚提交的任务、看看刚刚提交的任务有没有完成等等这些新特性。既然这个Future这么神奇,那我们就接着看一看它内部究竟定义了那些方法
Future 1 2 3 4 5 6 7 8 9 10 11 12 13 14 15 16 17 public interface Future <V> { boolean cancel (boolean mayInterruptIfRunning) ; boolean isCancelled () ; boolean isDone () ; V get () throws InterruptedException, ExecutionException; V get (long timeout, TimeUnit unit) throws InterruptedException, ExecutionException, TimeoutException; }
Future一共定义了五个有用的方法来帮助我们控制提交给线程的任务。
boolean cancel(boolean mayInterruptIfRunning)
使用这个方法可以尝试取消刚刚提交的任务。 参数mayInterruptIfRunning为true代表会尝试中断当前执行该任务的线程来尝试终止该任务,false代表正在运行的任务将会被完成。
boolean isCancelled()
如果此任务在正常完成之前被取消,则返回true。
boolean isDone()
如果此任务完成,则返回true。 完成可能是由于正常终止,异常或取消引起的,在所有这些情况下,此方法都将返回true。
V get() throws InterruptedException, ExecutionException
获取任务执行结果,阻塞直到该任务完成为止
V get(long timeout, TimeUnit unit) throws InterruptedException, ExecutionException, TimeoutException
带超时时间的阻塞获取任务执行结果方法
Future提供了五个很有用的方法来帮助我们对异步任务的控制,接下来我们开始分析它的实现类之一FutureTask的内部实现原理。在分析其内部原理前,我们先看一个使用FutureTask的例子,这样有便于我们对其有一个直观的理解。
例子 1 2 3 4 5 6 7 8 9 10 11 12 13 14 15 16 17 18 19 20 21 22 23 24 25 26 27 28 29 30 31 32 33 34 35 36 37 38 39 40 41 42 43 44 45 46 47 48 49 50 51 52 53 54 55 56 57 58 59 package com.example.demo;import java.time.LocalTime;import java.util.concurrent.FutureTask;public class Test { public static void main (String[] args) throws Exception { FutureTask<Person> task1 = new FutureTask <>(() -> { System.out.println("开始执行task1:" + LocalTime.now()); Thread.sleep(2000 ); Person person = new Person (); person.add(1 ); return person; }); Person person = new Person (); FutureTask<Person> task2 = new FutureTask <>(() -> { System.out.println("开始执行task2:" + LocalTime.now()); try { Thread.sleep(2000 ); } catch (InterruptedException e) { e.printStackTrace(); } person.add(2 ); }, person); task1.run(); int num1 = task1.get().num; System.out.println("task1执行完毕:" + LocalTime.now() + ":结果:" + num1); new Thread (task2).start(); int num2 = task2.get().num; System.out.println("task2执行完毕:" + LocalTime.now() + ":结果:" + num2); } static class Person { int num; void add (int n) { num += n; } } }
控制台输出
1 2 3 4 开始执行task1:20 :27 :44.244 task1执行完毕:20 :27 :46.245 :结果:1 开始执行task2:20 :27 :46.245 task2执行完毕:20 :27 :48.245 :结果:2
在上面的例子中分别通过FutureTask对Callable与Runnable进行了包装,任务都是对Person对象的num值进行一个add操作,通过Thread.sleep(2000)模拟这个耗时操作。然后调用get方法获取相应任务的结果,可以发现get方法是会阻塞当前执行这个get方法的线程的。下面我们就基于这个get方法来分析其内部原理。
原理 任务状态 FutureTask在执行任务的过程中定义了一系列的任务状态,一共分为以下几种状态
1 2 3 4 5 6 7 8 9 10 11 12 13 14 15 16 17 18 19 20 21 22 23 24 25 private volatile int state;private static final int NEW = 0 ;private static final int COMPLETING = 1 ;private static final int NORMAL = 2 ;private static final int EXCEPTIONAL = 3 ;private static final int CANCELLED = 4 ;private static final int INTERRUPTING = 5 ;private static final int INTERRUPTED = 6 ;
以上几种状态是在整个任务执行过程中可能出现的几种状态,不同状态间的转换只会存在以下几种情况
1 2 3 4 NEW -> COMPLETING -> NORMAL NEW -> COMPLETING -> EXCEPTIONAL NEW -> CANCELLED NEW -> INTERRUPTING -> INTERRUPTED
内部变量 1 2 3 4 5 6 7 8 9 10 private Callable<V> callable;private Object outcome;private volatile Thread runner;private volatile WaitNode waiters;
主要关注一下这个WaitNode,它是一个静态内部类,是一个单向链表的结构,在多线程调用get方法时,将这些线程通过cas组成链表的形式
1 2 3 4 5 static final class WaitNode { volatile Thread thread; volatile WaitNode next; WaitNode() { thread = Thread.currentThread(); } }
WaitNode初始化时会将当前线程保存起来,而WaitNode只会在awaitDone方法中被构造,同时awaitDone方法也只会在两个get方法中被调用,也就是说这个currentThread就是调用get方法的线程,这里你可能看不太明白,下面分析get方法原理的时候就明白了。
任务状态初始化 FutureTask内部有两个构造器,分别是对Callable与Runnable进行包装。两个构造器最终都会将成员变量callable设置为传入的任务,并且初始化当前任务状态为NEW
1 2 3 4 5 6 7 8 9 10 11 12 13 14 15 public FutureTask (Callable<V> callable) { if (callable == null ) throw new NullPointerException (); this .callable = callable; this .state = NEW; } public FutureTask (Runnable的构造器 runnable, V result) { this .callable = Executors.callable(runnable, result); this .state = NEW; }
如果传入的是Runnable对象,内部会通过Executors的一个静态方法来适配这个Runnable,最终返回的依旧是一个Callable
1 2 3 4 5 public static <T> Callable<T> callable (Runnable task, T result) { if (task == null ) throw new NullPointerException (); return new RunnableAdapter <T>(task, result); }
通常情况下FutureTask构造完毕,在我们将这个任务提交给相应的线程池或者线程时,我们就会去调用get方法来获取任务返回值,下面我们来分析get方法内部的原理,看看它是如何阻塞当前调用线程的。
get方法 Future中定义了两个get方法,一个是带超时参数,另一个是不带参数的,这两个方法的实现在FutureTask中大同小异,因此接下来就基于这个不带参数的get方法来分析
1 2 3 4 5 6 public V get () throws InterruptedException, ExecutionException { int s = state; if (s <= COMPLETING) s = awaitDone(false , 0L ); return report(s); }
首先第一步获取当前任务执行状态,正常情况下是NEW,不正常情况是有多个线程执行了同一个FutureTask,实际操作中我们应该一个任务对于一个线程,不要多个线程执行同一个任务(为什么要多个线程执行同一个任务?)因此在执行get前对状态做了一个判断,如果没有其它线程已经完成这个任务,就调用awaitDone方法,看这个方法的名字大概也能猜出来它的作用是用来等待任务完成的,言外之意就是让当前执行get方法的线程阻塞一下,等任务完成了再通知你。
awaitDone方法 1 2 3 4 5 6 7 8 9 10 11 12 13 14 15 16 17 18 19 20 21 22 23 24 25 26 27 28 29 30 31 32 33 34 35 36 37 38 39 40 41 42 43 44 45 46 47 48 49 50 51 52 53 54 55 56 57 58 59 private int awaitDone (boolean timed, long nanos) throws InterruptedException { final long deadline = timed ? System.nanoTime() + nanos : 0L ; WaitNode q = null ; boolean queued = false ; for (;;) { if (Thread.interrupted()) { removeWaiter(q); throw new InterruptedException (); } int s = state; if (s > COMPLETING) { if (q != null ) q.thread = null ; return s; } else if (s == COMPLETING) Thread.yield (); else if (q == null ) q = new WaitNode (); else if (!queued) queued = UNSAFE.compareAndSwapObject(this , waitersOffset, q.next = waiters, q); else if (timed) { nanos = deadline - System.nanoTime(); if (nanos <= 0L ) { removeWaiter(q); return state; } LockSupport.parkNanos(this , nanos); } else LockSupport.park(this ); } }
awaitDone方法带两个参数,分别对应超时的get方法和不带参数的get方法,如果任务没有完成最终都是通过LockSupport使当前线程阻塞的。接着回到get方法中
1 2 3 4 5 6 7 public V get () throws InterruptedException, ExecutionException { int s = state; if (s <= COMPLETING) s = awaitDone(false , 0L ); return report(s); }
现在我们已经知道调用get方法的线程会被阻塞在调用awaitDone方法那一行(其实是调用具体LockSupport.park方法的那一行),那么任务在完成后肯定是会唤醒当前线程的,线程是在是在什么时候被唤醒的呢?在以下三种情况下调用get方法的线程会被唤醒
任务正常完成时
任务执行过程中发生异常时
任务被取消时
还记得FutureTask实现的接口吗,FutureTask实现了RunnableFuture接口,而RunnableFuture接口继承了Runnable, Future接口,并且重写了Runnable的run方法,使得FutureTask成为了一个能够被线程执行的Runnable,所以FutureTask包装Runnable与Callable的目的就是要代理它们执行,而代理它们的话FutureTask必定就实现了RunnableFuture的run方法,这样线程在执行FutureTask的时候调用的就是其run方法,然后FutureTask内部的run方法又调用了被包装的Runnable与Callable,所以可以猜想在FutureTask的run方法中必定会在任务执行成功或者发生异常时唤醒调用get方法的线程。
run方法 1 2 3 4 5 6 7 8 9 10 11 12 13 14 15 16 17 18 19 20 21 22 23 24 25 26 27 28 29 30 31 32 33 34 35 36 37 38 39 40 41 42 43 44 45 46 47 48 49 50 51 public void run () { if (state != NEW || !UNSAFE.compareAndSwapObject(this , runnerOffset, null , Thread.currentThread())) return ; try { Callable<V> c = callable; if (c != null && state == NEW) { V result; boolean ran; try { result = c.call(); ran = true ; } catch (Throwable ex) { result = null ; ran = false ; setException(ex); } if (ran) set(result); } } finally { runner = null ; int s = state; if (s >= INTERRUPTING) handlePossibleCancellationInterrupt(s); } }
run方法在运行过程中可能是正常完成,也可能发生了异常,甚至是运行到一半被取消了,以上这三种情况下都会将调用get方法的线程唤醒。
setException方法 setException方法只会在线程执行任务发生异常时被调用
1 2 3 4 5 6 7 protected void setException (Throwable t) { if (UNSAFE.compareAndSwapInt(this , stateOffset, NEW, COMPLETING)) { outcome = t; UNSAFE.putOrderedInt(this , stateOffset, EXCEPTIONAL); finishCompletion(); } }
首先通过cas判断是否能将当前任务状态设置为COMPLETING,(因为即便当前任务发生异常也有可能被其它线程中断)如果成功的话(cancel方法只会取消状态为NEW的任务,所以只要cas成功if里面的代码就是线程安全的),则将返回值设置为发生的具体异常,然后改变任务最终状态为EXCEPTIONAL,最后调用收尾方法finishCompletion。
set方法 set方法只会在任务成功执行后被调用
1 2 3 4 5 6 7 protected void set (V v) { if (UNSAFE.compareAndSwapInt(this , stateOffset, NEW, COMPLETING)) { outcome = v; UNSAFE.putOrderedInt(this , stateOffset, NORMAL); finishCompletion(); } }
set方法的逻辑和setException方法大同小异,都是先cas判断再调用收尾方法finishCompletion。
finishCompletion方法 finishCompletion方法会在cancel方法返回true时、任务成功执行时即set方法能够成功执行时、执行任务发生异常时即setException方法能够成功执行时被执行。
1 2 3 4 5 6 7 8 9 10 11 12 13 14 15 16 17 18 19 20 21 22 23 24 25 26 27 28 29 30 private void finishCompletion () { for (WaitNode q; (q = waiters) != null ;) { if (UNSAFE.compareAndSwapObject(this , waitersOffset, q, null )) { for (;;) { Thread t = q.thread; if (t != null ) { q.thread = null ; LockSupport.unpark(t); } WaitNode next = q.next; if (next == null ) break ; q.next = null ; q = next; } break ; } } done(); callable = null ; }
finishCompletion的作用是确保阻塞在get方法中的线程无论如何都会被唤醒。
现在我们继续回到get方法中来,我们已经理清了调用get方法的线程是如何被阻塞的和唤醒的,接下来在被唤醒之后就是获取任务的执行结果了
1 2 3 4 5 6 7 public V get () throws InterruptedException, ExecutionException { int s = state; if (s <= COMPLETING) s = awaitDone(false , 0L ); return report(s); }
也就是说在线程被唤醒之后会返回当前任务的明确状态,然后report方法根据状态来返回相应类型的返回值
report方法 1 2 3 4 5 6 7 8 private V report (int s) throws ExecutionException { Object x = outcome; if (s == NORMAL) return (V)x; if (s >= CANCELLED) throw new CancellationException (); throw new ExecutionException ((Throwable)x); }
outcome的值可能是任务执行返回的值,也可能是执行过程中抛出的异常,分别是在set方法与setException方法中被设置的,但如果s的状态是CANCELLED、INTERRUPTING、INTERRUPTED中的一种的话,那么最终会抛出CancellationException,否则的话,即s为EXCEPTIONAL的话则表明任务执行过程中发生了异常,最终抛出ExecutionException。
cancel方法 1 2 3 4 5 6 7 8 9 10 11 12 13 14 15 16 17 18 19 20 21 22 23 public boolean cancel (boolean mayInterruptIfRunning) { if (!(state == NEW && UNSAFE.compareAndSwapInt(this , stateOffset, NEW, mayInterruptIfRunning ? INTERRUPTING : CANCELLED))) return false ; try { if (mayInterruptIfRunning) { try { Thread t = runner; if (t != null ) t.interrupt(); } finally { UNSAFE.putOrderedInt(this , stateOffset, INTERRUPTED); } } } finally { finishCompletion(); } return true ; }
cancel方法只会取消状态为NEW的任务,如果mayInterruptIfRunning参数为true则会尝试中断当前正在执行任务的线程。最终无论如何都会调用finishCompletion方法唤醒调用get方法的线程。
runAndReset方法 1 2 3 4 5 6 7 8 9 10 11 12 13 14 15 16 17 18 19 20 21 22 23 24 25 protected boolean runAndReset () { if (state != NEW || !UNSAFE.compareAndSwapObject(this , runnerOffset, null , Thread.currentThread())) return false ; boolean ran = false ; int s = state; try { Callable<V> c = callable; if (c != null && s == NEW) { try { c.call(); ran = true ; } catch (Throwable ex) { setException(ex); } } } finally { runner = null ; s = state; if (s >= INTERRUPTING) handlePossibleCancellationInterrupt(s); } return ran && s == NEW; }
在FutureTask内部还有一个受保护的runAndReset方法,它内部执行的逻辑和run方法执行的逻辑差不多,只不过这个方法不会设置FutureTask的值,也不会在执行成功后唤醒任何调用get方法的线程,方法注释上表明这个方法是用来给那些需要执行多次的任务设计的。
总结 FutureTask实现了RunnableFuture接口使自身成为了一个Thread能够执行的Runnable,而RunnableFuture又继承了Future接口,Future接口内部定义了许多对已提交任务的控制方法。例如判断任务是否已完成、取消任务等等。同时FutureTask提供了两个构造器来对Callable与Runnable进行了包装,同时内部重写了run方法,所以当我们将一个FutureTask提交给线程执行时,本质相当于委托这个任务交给FutureTask来控制,而FutureTask内部又是通过CAS+LockSupport来控制着任务的执行流程,从而实现Future接口中那些对任务控制的方法,方便我们能够细粒度的操作已提交的任务。